Intro to Kegging
Kegging is one of the topics that I receive the most questions on. Perhaps because most people have little experience with using compressed gas, the extra equipment needed to get started with kegging can seem daunting. The reality is that kegging is very easy.

A pin lock beer out post
The quick disconnect is held onto the post by the three pins.

The post on a ball lock keg.
The standard type of keg used in homebrewing is the corny keg. These are the type of kegs that soda syrup used to come in. They can often be found used, but can also be purchased new at about twice the price as used. The used kegs are perfect for homebrew, they hold five gallons, are made of stainless steel, can easily be cleaned and will provide years of use. They come in two standard styles, ball lock and pin lock, with the primary difference being the type of disconnect used to attach the keg to the gas and dispensing systems. Both styles are fine, thou you may want consistency throughout your system for ease of use.
The body of the keg is made of stainless steel. They have an oval hole in the top with a lid that locks into place. On either side of the lid are two posts that take quick disconnects, one for gas in and the other for liquid out (they are not interchangeable):. When the keg is not connected to the gas and/or beer line the keg is a closed system perfect for beer storage. It is air tight and won’t allow in light. On the inside of the keg, a stainless steel tube extends down from each post. The post extending from the gas side is short, while the tube extending from the liquid side extends to the bottom of the keg. As gas is introduced at the top of the keg, beer is pushed up through the beer out tube. The lid will often have a pressure release valve, that allows you to depressurize the keg after use.
The pressure in a filled CO2 tank is approximately 1200 pounds per square inch (PSI). This is a tremendous amount pressure, that if released directly into a keg could quite literally cause it to explode. A regulator is used to control the release of CO2. One end of the regulator screws onto the CO2 tank while the other end will have some sort of hose barb to accept a gas line. The body of the regulator will have an adjustment screw, and at least one pressure gauge. When the regulator is screwed onto the gas tank, and the gas tank is fully opened, the pressure gauge will read the pressure at which the CO2 leaves the regulator. this can be adjusted by turning the adjustment screw on the body of the regulator. Turning the screw to the right will increase the pressure, while turning it to the left will decrease the pressure. When first serving from a keg, start low around 5 psi and increase the pressure until the beer is flowing freely but not causing excess foam.

A Dual-Gauge Regulator
The gauge to the left measures the pressure inside the gas tank. The gauge on top measures the serving pressure,which is adjusted by the brass screw in the center of the body (red) of the regulator.
You can purchase regulators with either one or two gas gauges. If there is only one gauge, it will read the pressure of the CO2 as it leaves the regulator. If it has two, the second gauge will read the pressure of the gas tank. In theory this will tell you when you are low on CO2, the realty is that this gauge can be close to but not completely useless. This is because the gauge will read steady until the tank is almost empty, and then it will decrease in pressure rapidly until the tank is empty. The only sure way to determine how much CO2 is left is to weigh the tank. The gauge is useful in letting you know when the tank is empty and when it is about to be. I know when I see the pressure in the tank start to drop that I may have enough gas to pull a few more pints but that I am going to need to replace it very soon.
You can accurately determine the amount of remaining CO2 by weighing the tank. As indicated above, the tanks are denominated by the weight of the CO2 when the tank is full. You can figure out how much gas is left by weighing the tank, without the regulator on, and then subtracting the “tare” weight of the tank. The tare weight, is the weight of the tank by itself and is embossed on the side of the tank. This will give you the weight of the CO2 left in the tank. While the number of kegs that can be served from a 5lb tank will vary, it is not unusual to be able to carbonate and serve between 6 and 8 kegs.
PACKAGING
Getting your beer into the keg is significantly easier than bottling, and takes only a fraction of the time. The time savings are one of the major draws of kegging, and I moved to kegging almost exclusively once I moved up to 10 gallon batches. As with bottles, you will want to make sure that the keg has been thoroughly cleaned and sanitized before filling it with your beer. (see below)

The top of a ball lock keg, with the
lid removed.
In order to fill the keg, you just remove the lid and siphon the beer directly into the keg. Once the keg is full, you replace the lid and lock it into place. I will then slightly pressurize the keg in order to set the seals. The internal pressure of the keg will push up on the lid as well as the seals on the posts and force them closed tight. The keg can now be carbonated and/or stored until needed. If you are worried about oxygenation, you can flush the keg with CO2 before you rack, or you can vent and re-pressurize the filled keg a few times by pulling up on the pressure release valve on the lid. This will force most of the oxygen out of the head-space in the keg.
There are a few options when it comes to carbonating your beer. The standard method of carbonating bottles is to prime the beer with a measured amount of sugar. As the remaining yeast breaks down the sugar creating carbon dioxide, the CO2 is unable to escape a capped bottle and dissolves (or remains) in the beer. Kegs can also be carbonated in this manner, but the amount of sugar used is less than would be used to carbonate a comparable volume of bottled beer.
The amount of CO2 in the beer is measured as a unit of volume. At the end of fermentation there is a residual volume of CO2 present in the beer. Since the amount of CO2 added to the beer is determined by the amount of sugar added when priming, you first need to determine how much residual CO2 is left over after fermentation. If you don’t account for the residual CO2, you can easily over carbonate. The amount of residual CO2 is determined by the temperature of the fermenting beer and the temp it is stored at before being primed. You can reference a chart for this information. The residual volume is subtracted from the target volume, which gives you the amount of CO2 that needs to be added from which you can calculate the amount of priming sugar to add.
Kegging allows a second option, Force Carbonating your beer. In order to force carbonate your beer, the beer is hooked up to compressed CO2 and placed under pressure. Over time the CO2 will be absorbed into the beer. The amount of CO2 dissolved into the beer, and thus the level of carbonation can be precisely controlled by referencing a carbonation table. By referencing the temperature that the beer is being stored against the desired level of carbonation, the chart will tell you the precise pressure to set the CO2 at. Since the total amount of CO2 that can be absorbed into the beer is a function of temperature and pressure there is no need to determine the amount of residual CO2 present in the beer at the end of fermentation.

If you look closely at this pair of ball lock posts,
you will notice that the “hump” in the middle of
the post on the left is larger than the one on the
right, this is the beer side post.
Both the beer and the gas lines connect to the posts with quick disconnects. They are color coded, with the black disconnect used for beer out and the gray disconnect used for gas in. While the posts on a ball lock keg may look alike, they are slightly different with the beer out post having a slightly wider hump in the middle ( see the picture). A word of warning, it is possible to fit the gas disconnect on the liquid out post although it will not go one easily. If you are finding it difficult to get the disconnect onto the post, check to make sure that you are trying to get it on the right post. The beer out disconnect will fit easily on the gas post, but it will be to loose. The connections should be snug and if the disconnect goes on to easily, check to make sure you haven’t switched the disconnects.
DISPENSING
Dispensing your beer from a keg can be broken down into two distinct parts. A beer side and a gas side. While there may be some variation, the beer side simply consists of a faucet, a length of beer line and a disconnect that attaches to the beer out post on the keg. The gas side is a bit more complicated, but not by much. The gas side will usually consist of a source of compressed gas, a regulator to control the gas pressure, a length of gas line, and a disconnect that attaches to the gas in post on the keg.
When both the beer side and the gas side are connected to the keg, the gas entering the keg puts pressure on the beer and attempts to push the beer down. When the beer faucet is opened, the pressure in the keg is released by pushing the beer up the stainless steel tube and out of the keg, running through the beer line, out the faucet and into a glass. The speed at which the beer will exit the keg is determined by the pressure of the CO2 as it enters the keg , and this is controlled by the regulator. If the pressure is to high, the beer will foam as it pours into the glass, to low and it will be slow to fill the glass. When dialing in your system, it is best to start low and slowly ratchet up the pressure until you reach a good serving pressure.

Ball Lock Quick Disconnects - g
rey is for gas, black is for beer. They’re built to fit properly over the different sized posts.
Although there are other ways to obtain CO2, the most common method is the use of an aluminum CO2 cylinder. They come in a number of sizes denominated by how much the CO2 weighs when the tank is filled, with 5lb and 10lb tanks being the most commonly used. Steel cylinders can also be had, but they weigh significantly more than the aluminum tanks. The tanks need to be reinspected every five years and can be filled at most welding supply shops.

5 and 10lb CO2 tanks, for comparison
CLEANING
As with everything else in homebrewing, cleaning and sanitizing is an important part of kegging. When you buy kegs, whether their new or used (but especially if their used), you are going to want to disassemble the keg and thoroughly clean it. You start by removing the posts at the top of the keg. These will screw off with the aid of a wrench. Craftsman makes a ratcheting wrench (#42165) which is perfect for removing the posts off of a ball lock keg. One end of the wrench is 11/16 while the other end is 7/8, and these happen to be the two most common size posts. A socket wrench adapter is available to remove the posts off of pin lock kegs.

Wrench for the removal of ball lock posts
Once the posts have been removed you can pull out the dip tubes, and remove the rubber o-rings. There are a total of five o-rings on each keg. There is a large o-ring that fits on the lid. There is an o-ring on the outside of each post that creates the seal between the post and the disconnects. Their is also an o-ring that forms a seal between the dip tubes and the keg. At a minimum I replace the o-rings on the outside of the posts every time I reuse a keg. The mechanical action of putting on and removing the disconnects easily damages the o-ring and will cause it to leak either beer or gas. Neither of which is much fun. For good measure I also replace the o-rings on the dip tubes, although you can get a good number of kegs out of them. When purchased in bulk both of these o-rings are very inexpensive. The o-ring for the lid is a bit more expensive and I try to use theses until I see wear on them.
You can purchase replacement o-rings at pretty much any Homebrew supplier, they will charge you between $3 and $5 for a complete set of 5 o-rings. A better option is to purchase the o-rings in bulk from McMaster Carr. This drops the price for the post o-rings to pennies a piece. McMaster Carr is an industrial supplier, and the best way to find the o-rings is by their item number.

A full set of o-rings for a ball lock keg.
As of April 2012 these are the part numbers and prices for the o-rings at McMaster Carr:
Ball Lock Kegs
Post O-rings: item # 9452K23 $2.48 for 100
I have also been told that silicone o-rings make a better seal on the gas side, but I have not noticed a problem with the o-rings referenced above. But if you want the silicone are item # 9396k24 $11.48 for 100
Dip tubes: item # 90025K368 $7.61 for 100
I am told that 9452k172 $2.21 for 100 also work, but have not used them myself.
Lids: item # 9452k218 $12.69 for 10
Pin Lock Kegs – take a slightly different sized Post o-ring
Post O-ring item # 9452K23 $2.48 for 100
Post O-rings item # 9396K24 (silicone)
The post consist of two parts, the body of the post and the poppet. The poppet sits inside the post body. It has a spring that pushes it up against the hole in the top of the post and forms a seal. When a disconnect is attached to the post, it pushes the poppet down allowing either gas or beer to flow into or out of the keg. Once the post has been removed from the keg, the poppets should come out of the post easily, although you may need to push down on the poppet to get it to pop out of the post body.
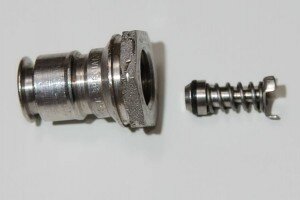
Ball lock post and poppet, disassembled
Once the keg has been disassembled it can be properly cleaned. My favorite way to clean a keg is to fill it with water and Oxyclean or Powdered Brewery Wash. I fill the keg about 2/3 with warm water and some cleaner and allow it to sit for 24 hours. I then flip the keg over into either a bucket or garbage can, that has also been partially filled with water and cleaner. The water in the bucket will form a seal around the keg and keep the cleaner from fully dumping out. (This is the same way that a water cooler works). The cleaner in the bucket will soak the top of the keg including the post threads. I soak the lid of the keg in the bucket as well. The posts and poppets are allowed to soak in a separate jar with cleaner. I then rinse the kegs off with fresh water. This method is good enough for most cleanings, and is how I treat all but the most dirty kegs.
Occasionally I will have a keg that needs extra attention. In those instances I use a product called Barkeepers Friend and a 3M scour pad. The Barkeepers friend is an excellent cleaner for stainless steel . Not only will it clean the stainless, but it will also re-passify the steel. Passivisation is what gives stainless steel it’s “stainless” properties. Do not use Brillo or steel wool. Stainless steel is relatively soft, and the steel wool can leave little bits of itself imbedded in the stainless steel. This will cause rust spots to form on the keg.
If you have thin arms you may be able to get your arm through the top of the keg. I find that while my arm fits, it is a bit uncomfortable. Reaching the top of the keg is fairly easy, but scrubbing the bottom of the keg can be problematic. The are a number of devices that are sold to clean kegs and reach the bottom. If you want to avoid the added expense, you can try attaching the scouring pad to a stick.
Any no rinse sanitizer will be sufficient to sanitize your kegs before use. Follow the instructions on the bottle for for mixing it with water. I like to reassemble the keg right before use. I use a spray bottle to spray sanitizer down the dip tubes and the inside of the posts as I put them back onto the keg. I fill the keg with a small amount of mixed sanitizer solution and will replace the lid before shaking the keg to coat the inside of the keg with sanitizer. I will allow the keg to sit while I prepare my beer for racking to assure proper contact time for the sanitizer. When I am ready to keg, I will dump the sanitizer into a bucket, take off the lid and place that into the bucket with the sanitizer and then rack into the keg.
The above article was written by one of our members, Matt Schaefer. Matt has been brewing for over 15 years and recently published a book on homebrewing. You can find his book on Amazon (http://www.amazon.com/Illustrated-Guide-Brewing-Beer-Comprehensive/dp/1616089172).
Copyright 2012 Matthew E. Schaefer – used with permission, all rights reserved.